Showing posts with label –. Show all posts

Sunday, May 4, 2014

Perfect French Baguette at Home – Only Impossible If You Don’t Try It

Whenever someone asked me why I hadn’t done a baguette video yet, I’d tell them because you just can’t recreate an authentic loaf of French bread at home. 

I’d explain about the water, the flour, the centuries old starters, and the steam-injected ovens. I told them what I’d been told; that it was simply impossible, or as the French say, "impossible!"

That was, until I actually tried to make some. Much to my amazement, not only was it possible, it was really pretty simple. The key is water. That goes for the dough, and the baking environment. The dough must be very sticky, as in hard-to-work-with sticky. This is nothing well-floured fingers can’t conquer, but I did want to give you a heads-up.

Besides the water content in the dough, the oven must also be moist. This humidity, in addition to some occasional misting will give the crusty baguettes their signature look. How does this work? You know how when someone pours water on the rocks in a dry sauna, and suddenly it feels way hotter? It probably has something to do with that.

Anyway, who cares why it works, the important thing here is that real, authentic, freshly-baked baguette is now an everyday reality. One thing worth noting; I adapted this no-knead version from a recipe I found herelast year. The original is in metric, so I’ve converted it, but also included the original flour and water units in case you want to get it exact. I hope you give this easy, and so not impossible baguette recipe a try soon. Enjoy!


For 4 smaller or 2 large baguette:
1/4 tsp dry active yeast (I used Fleischmanns Rapid Rise Yeast)
(Note: if you want to use a traditional bread technique, add the whole package of yeast (2 1/4 tsp) and proceed as usual)
1 1/2 cups water (325 grams)
1 3/4 tsp salt
18 oz by weight all-purpose flour (500 grams), about 4 cups
- Mix dough and let rise 12-14 hours or until doubled
- Punch down and shape loaves, let rise covered with floured plastic 1 to 1 1/2 hr or until almost doubled
- Bake at 550 F. about 15 minutes or until well-browned
- Spray with water before baking, at 5 minutes, and at 10 minutes during cooking time
Read More..

Saturday, April 5, 2014

Beef Tenderloin Medallions with Caramelized Tomato Mushroom Pan Sauce – I’m Glad I Used All Clad

My friends at All Clad recently sent me an invitation to take part in a contest to develop a recipe showing off their 10-inch Stainless Steel Fry Pan. After carefully considering the offer for several seconds, I let them know I’d be thrilled to participate, and even more thrilled to accept their free pan.

After a little brainstorming, I decided seared beef medallions with pan sauce would best highlight the benefits of using this type of pan. Once I decided on a general direction, it was time to pick ingredients. For medallion meat, I chose soft and buttery tenderloin. For the pan sauce, I went with mushrooms and tomato, as I knew they’d allow me to show how spectacular a sauce one can achieve with proper caramelization.

There are two huge advantages to high-quality cookware (three, if you count how cool they look hanging on your pot rack). Because the steel is thicker and denser, the pan not only retains heat much better, but it distributes that heat very evenly. In this recipe, the advantages of both are seen quite clearly.

First of all, we’re able to do a very high-heat sear, with the surface of the medallions getting a beautiful brown crust, while the inside stays nice and rare, thanks to the short cooking time the pan’s heat retention affords.

Secondly, as we’re caramelizing the mushrooms and tomato sauce, you can see the advantages of superior heat distribution. This sauce is very easy, but if you’re using a thin, cheap pan, you’re going to get “hot spots,” which makes browning the sauce base more difficult. Certain areas will scorch and burn quickly, and you don’t get nice even caramelization. Here, you can see that wasnt an issue.

Above and beyond the advantages of the cookware, the recipe tasted amazing. I mean, come on, I can’t give the pan all the credit. It’s one of those dishes that unless someone watched you make it, they’d never believe how fast and simple it is to prepare. By the way, this wonderful sauce would work just as well with pork, veal, or chicken. 

Anyway, thanks to All Clad for the pan and invitation to participate in this contest. I can’t wait to see what other bloggers are participating, and what they’re making. Please stay tuned for more details and results in the near future. In the meantime, I hope you give this great recipe a try soon. Enjoy!


(Since this was for a contest, I was forced to type up the recipe!)

Seared Beef Tenderloin Medallions with Caramelized Tomato & Mushroom Pan Sauce

For 4 servings:

2 lbs beef tenderloin, trimmed, cut into 8 (4-oz) medallions, about 1-inch thick (this will also work with chicken breasts or pork chops)
salt and pepper to taste
1 tablespoon vegetable oil for searing
1 tablespoon unsalted butter
1 tablespoon olive oil
8-10 white button mushrooms, sliced thin
1/2 cup marinara sauce (mine had basil and garlic in it, but any prepared tomato sauce will work)
1/3 cup Marsala wine
1 cup veal stock or chicken broth
2 tsp freshly chopped oregano leaves
1 1/2 tablespoons cold butter, cut into cubes

Season beef medallions generously with salt and pepper to taste. Put vegetable oil in a stainless steel pan, and place over high heat. When the oil just begins to smoke, sear the beef for about 2 minutes per side. The meat should get a nice brown crust, but do not cook all the way through, as it will finish cooking in the sauce. Turn off heat, and remove beef to a plate, and reserve until needed.

Add the butter and olive oil to the pan, and place over medium-high heat. Add the mushrooms and a pinch of salt. Cook the mushrooms, stirring often, for about 10 minutes, or until very well browned. Add the tomato sauce, and cook, stirring, for about 5 minutes, or until the tomato sauce thickens and caramelizes on to the bottom of the pan.

Pour in the Marsala wine, and raise heat to high. As the wine comes up to a boil, use a wooden spoon to scrap any caramelized bits on the bottom of the pan. When almost all the wine has evaporated, add the stock or broth. Bring to a boil, and cook, stirring occasionally, for about 5 minutes, or until the mixture has reduced by about half.

Reduce the heat to low, and add the beef medallions back in. Simmer gently for 2-3 minutes, or until the meat is heated through and cooked to your preference. You can add more stock if sauce seems too thick.

Remove the medallions, and divide on four hot plates. Turn the heat off under the sauce, and stir in the oregano and cold butter. Stir constantly until butter has disappeared into the sauce. Taste for seasoning, and adjust if needed. Spoon over meat and serve immediately. Enjoy!

View the complete recipe

Read More..

Sunday, March 30, 2014

Sweet Potato Casserole with Pistachio Crust – Save the Mini Marshmallows for Your Hot Chocolate!

Of all the traditional Thanksgiving side dishes, sweet potato casserole scares me the most. Luckily, for the vast majority of holiday meals, I’ve been the one who got to decide on and cook the menu. But there have been the rare occasions when I’ve been a guest at someone’s home, and subjected to the horror that is the mini marshmallow-topped dish of sweet potatoes.

Don’t get me wrong, when it comes to food, I’m as opened-minded as anyone...hey, one time, I actually ate a McRib...but I just don’t understand taking something already as sweet as sweet potatoes, and topping it with one of the sweetest ingredients ever.

Sure, my topping has some brown sugar in it, but I think it’s balanced nicely by the crunchy savoriness of the pistachios. I also forgo the usual scoop of sugar in the filling for a much smaller amount of maple syrup (which, contrary to what you learned in school, is a one-syllable word).

The result is a rich and decadent, yet not cloyingly sweet side dish. By the way, as I mention in the video, the sweet potatoes I used may be called “yams” at the store, but the fact is that all yams sold in American supermarkets are really varieties of sweet potatoes.

Having said that, my recommendation is for using “Garnet Yams,” if you can find them. If you can’t, literally any other variety will do. I hope you give this great side dish recipe a try. Enjoy!


Ingredients:
For the sweet potatoes:
2 1/2 lbs sweet potatoes
salt to taste
2 tbsp butter
2 large eggs
1/4 cup maple syrup
1/4 cup buttermilk
1/3 cup milk
1/2 tsp vanilla
1/2 tsp salt
pinch of allspice
pinch of cayenne
For the pistachio crust:
1/2 cup chopped pistachios (I used roasted, salted)
1/2 cup light brown sugar
1/3 cup all-purpose flour
4 tbsp melted butter
Read More..

Saturday, March 22, 2014

Italian Rice Croquettes aka Rice Balls aka Arancini – Back by Popular Demand… Aunt Angela and Uncle Bill D’Arduini!

I just flew back from New York, and boy, are my jokes tired (as you’ll hear). So is everything else, and there’s no rest for the weary as I pack for a quick trip to see the team at Allrecipes.com in Seattle. So, time is short, and I’m posting this incredibly delicious Italian rice croquette recipe, sans extra wordy article.

There isn’t much to add anyway; what you see is what you get. This great appetizer was filmed at a recent family dinner at my Aunt Angela and Uncle Billy D’Arduini’s, and if they sound familiar, they should! They’ve been featured on the blog numerous times; in such smash hit recipes as, Cabbage Rolls, Chicken D’Arduini, and Homemade Pasta.

You can definitely do this recipe completely vegetarian, by skipping the giblets, or switch those out for almost any other cooked meat. Sausage, prosciutto, or ham are just a few of the many options.

When it comes to the rice, we used a standard long rain, and went with a 2 parts water to 1 part rice ratio. You want fully hydrated and completely cooked grain. Al dente rice is not going to work here. Slightly overcooked is not a problem.

Anyway, Id like to thank Aunt Angela and Uncle Bill for sharing their recipe, and I hope you can give it a try soon. It would be a great addition to any party menu. Enjoy!


Ingredients:
*Sorry, I never found out how many this makes, but I’m guessing about 70-80
2 pounds cooked chicken giblets (gizzards and hearts)
2 cups rice cooked in 4 cups salted water
2 cups grated Parmesan cheese
2 tbsp parsley, optional
1/4 cup breadcrumbs
2 large eggs
1/2 cup marinara sauce
salt and pepper to taste
plain breadcrumbs, as needed
vegetable oil for frying
lemon wedges
Read More..

Tuesday, March 18, 2014

Wild Halibut Steaks with Warm Bacon Dressing – Mmmmm… Bacon

Yes, it’s true what they say, bacon makes everything tastes better. Even bacon tastes better with bacon. Recently I saw an online lecture by a woman who makes specialty chocolates and she had actually done chocolate with bacon. So, now it’s really official, bacon goes with everything! By the way, I plan on posting her lecture, which I found equally inspiring and perplexing, but that’s for another day.

Today we’re making a very simple warm bacon dressing to go over some pan cooked halibut. With just a few ingredients, and a very simple procedure, we’re going to produce some amazingly delicious results. The smokiness of the bacon is such a great match with the meaty halibut, and the slightly sweet/sour profile of the fresh lemon and rice vinegar brings this all together. Usually at this point I tell you a few ways you can alter the recipe to match your personal tastes…forget that. Make this exactly like I show you. Enjoy!


Ingredients:
2 halibut steaks (about 3/4 to 1 inch thick)
1/2 lemon
1/3 cup seasoned rice vinegar
4 strips of bacon
fresh parsley to taste (about 1/2 bunch for me)
salt and pepper to taste
* I served this on baby romaine, but any greens would be nice
Read More..

Saturday, March 15, 2014

BROWN RICE AND LENTIL SOUP – DIET SERIES 1


This week I will be posting the dishes, which I have been making for the past few weeks for my husband (a part of his weight loss plan and he has lost more 20 pounds so far…so I guess my dishes seem to work :). My next 2 recipes are also in the same combination of lentils and whole grains. Meals or soup like these, especially the combination of whole grains with lentils and vegetables are filling and healthy too and doesn’t make us miss out on our favorite foods. The soup recipe I have posted here is more or less sambar rice we make, but a little bit on the healthier side with lots of veggies and brown rice. This makes a complete meal by itself with a salad on side. I used a pressure cooker to cook the soup for fast cooking. This can be done on stove top too, it takes a little longer to cook the lentils this way but the taste is the same.


INGREDIENTS:

1. Lentils like green lentils, or masoor or moong dhal ½ cup.

2. Brown rice, ½ cup.

3. Onion, medium size, 1.

4. Diced tomatoes (fresh or canned), ½ cup.

5. Mixed vegetables, chopped into small pieces, 1 cup.

6. Cumin seeds, 1 tablespoon.

7. Coriander seeds, 1 tablespoon.

8. Salt and pepper as per taste.

9. Mixture of dry herbs, 1 tablespoon.

10. Garlic, 2 cloves.

11. Any seasoning mixture, 1 teaspoon.

12. Vegetable broth or tomato juice, 1 cup ( I sometimes use V8 tomato and vegetable soups, this gives a nice color to the soup and increases the veggie servings too).


PREPARATION:

Grind the cumin seeds and coriander seeds and keep aside. Dice the onion finely and crush the garlic coarsely. Heat a pressure pan or cooker with some oil. Add the diced onions when the oil turns hot and sauté for a few minutes until they turn brown. Add the canned tomatoes along with the veggies, crushed garlic, lentils, 3 cups of water, broth or tomato juice, salt and pepper and mix everything well. Cook for up to 3 whistles and let the pressure down. Add the ground powders and dry herbs now and mix everything well. Ladle hot soups into bowls and enjoy with a dollop of sour cream or nonfat yogurt on top.


A lighter version of the same soup made next week and served with salad.


Read More..

Thursday, March 13, 2014

Grilled Kiwi Chili Rubbed Beef Short Ribs – Labor Day Cooking Shouldn’t Be a Lot of Work

Labor Day weekend is always a bittersweet holiday. It’s supposed to honor America’s organized labor movement, but really what it mostly celebrates is the end of summer. 

Pretty soon our grills will be covered by huge snow drifts, and the season’s warm breezes will be a distant memory. Well, not for me, as I live in California, but you get the point.

This grilled kiwi and chili-rubbed beef short ribs recipe is specifically designed with that melancholy in mind. The prep is minimal, and the ultra short cooking time means that instead of being stuck in front of a grill, you can actually enjoy more of these last precious summer days.

We tied the world record here for fewest ingredients in a marinade, with one, but thanks to the kiwi’s enzymatic magic, that’s all we need. Unlike some tropical fruit marinades, kiwi doesn’t turn the meat into mush, and provides a nice, slightly sweet and acidic base for our Ancho chili rub. I loved how this came out, and while highly-seasoned, the beefy goodness of the short ribs really came through.

I want to wish all of you a happy and healthy Labor Day weekend. What better way to celebrate organized labor, than by doing the minimum amount of it at your cookout? I hope you give these super simple, but very delicious kiwi and chili-rubbed short ribs a try soon. Enjoy!


Ingredients for 4 portions:
2 pounds Korean-style (aka flanken style) beef short ribs
1 kiwi
For the chili rub:
1 tbsp ancho chili powder
1 tbsp sugar
1 tbsp kosher salt
2 tsp freshly ground black pepper
1 tsp garlic powder
1/4 tsp cayenne, or to taste
Read More..

Saturday, March 8, 2014

“Pad Thai” Popcorn – How Five Seconds of Late Night TV Changed the Future of Caramel Corn

Every once in a great while, I get a food wish from someone I admire and respect so much that I just can’t say no. This “Pad Thai” popcorn recipe was their latest request, and as always, I was more than thrilled to make this very influential person’s snack dream come true. Who is this mystery foodie? Me!

I was channel surfing late one night, and caught the very tail end of a show featuring a hot spot in Charleston, SC, called The Gin Joint. The theme was unique bar eats, and the host was talking about something called, “Pad Thai” popcorn. What was that?

I heard those words, and saw maybe five seconds of footage of what looked like caramel corn in a basket, and that was it. Frustrated, but quite excited, I jumped online to find the bar’s website, and hopefully the recipe. Nothing.

There were a few links with people talking about it, and a couple cell pictures, but no actual official recipe to be found. So, I decided to give myself a food wish – figure out how to recreate this extraordinary-sounding snack. I decided to simply fortify a standard caramel corn recipe with peanuts, lime, hot chilies, fish sauce, and cilantro.

Maybe it was beginner’s luck, or the collective consciousness of all the poor souls who’ve tasted that popcorn and desperately wished they could make it at home, but it came out incredibly well. Crispy, crunchy, sweet, spicy, aromatic, and awesome! You know I’m a fan of the hyperbole, but it’s with all sincerity that I say, this may be the greatest caramel popcorn-related snack breakthrough since balls.

By the way, since this was my first attempt, please feel free to adjust the ingredients amounts and report back. I think next time I’ll add a bit more lime and fish sauce, for a little extra kick. I may also explore using tamarind juice and/or palm sugar. Anyway, I hope you give this unbelievably addictive “Pad Thai” popcorn a try soon. Enjoy!


Ingredients for about 8 cups of Pad Thai Popcorn:
1/3 to 1/2 cup popping corn kernels (roughly 8 cups prepared popcorn)
1 cup finely chopped dry-roasted, salted peanuts
1/4 cup chopped cilantro
For the caramel sauce:
1/2 cup packed brown sugar
1/4 cup vegetable oil
1/4 cup corn syrup
2 or 3 tsp fresh lime juice
1 tbsp freshly grated lime zest
1 1/2 tbsp Asian fish sauce (fyi, if you dont use fish sauce, youll have to add salt)
1 rounded tablespoon Sambal red chili sauce, or very finely diced fresh hot chilies
rounded 1/4 teaspoon baking soda (not baking powder)
*bake 45 minutes at 250 degrees F., tossing 3 or 4 times during the cooking.

View the complete recipe

Read More..

Friday, February 28, 2014

Couscous Primavera – Because I Dont Get Enough Hate Mail from Morocco

Well, it started before I even posted the recipe. Heres a comment from the couscous primavera tease post I did yesterday:

Soukaina said... "plz plz plzzzzzzzzzz !! I am begging you !! stop massacring couscous !! Im a Moroccan ; been born there , lived there my entire life so I know what Im talking about !! theres one way and one way only to make couscous , and yours is just not it !! but if you prefer changing some ingredients or adding some stuff to it? thats fine ! do as you wish !! just dont call it couscous."

First of all, Im only calling this couscous because the package says, "Couscous," and the stuff inside the package was couscous – or at least what we Americans get as couscous. 

Secondly, as with all my ethnically inspired dishes, I dont claim this is in any way authentic. Im sure its not, but not having ever had "real" Moroccan couscous I cant argue which version is better, so Ill just assume mine is.

Anyway, the point is, were not trying to "massacre" anyones cultural/culinary heritage. This is how we do couscous around these parts, and its tough to knock a healthy, delicious, and easy side dish that takes about 10 minutes to make.

Im obviously borrowing the name from the ubiquitous spring dish, Pasta Primavera, which like this recipe hopes to take advantage of fresh, seasonal, green produce. Speaking of which, you are highly encouraged to use whatever vegetables look good at your local (hopefully farmers) market.

Please note: check the instructions on whatever package of couscous you happen to use. Times vary from 5-10 minutes depending on the brand. Enjoy!


Couscous Ingredients:
2 cups couscous
2 tablespoons olive oil
1 jalapeno, minced
1/2 cup chopped green onions
1/2 tsp cumin
salt and freshly ground black pepper to taste
big pinch of cayenne
2 cups vegetable or chicken stock
1 small bunch asparagus, cut into 1/4-inch pieces
1 cup freshly shucked green peas (or sub frozen like me)
2 tablespoon chopped fresh mint, or other sweet herbs

View the complete recipe

Read More..

Thursday, February 27, 2014

Sausage Shrimp Paella – Before You Run You Walk Or In This Case Crawl

When I first do a version of a classic dish like paella, I try to use a minimum of number of ingredients and steps so we focus on the technique. So, while you experienced paella makers will probably find this quite unremarkable, it really is intended for the first-timer. 

Real paella is not baked, but cooked on top of a fire, which results in a similarly textured rice to what you see here, except a layer caramelizes onto the bottom of the pan, and those gloriously crunchy bits are considered the best part. So, basically I’m telling you we left out the best part.

The trade-off is that this method eliminates most of the finesse and monitoring required by the traditional method. Consider this a gateway paella, and the first step to a serious, lifelong addiction. Besides the method, ideally you’ll use a wider variety of ingredients; things like clams, mussels, squid, chicken are all very commonly used, and will make your rice that much more interesting.

No matter how you cook you paella, one thing you must try to include is the saffron. Besides the short-grain rice, this is probably the most key addition. Unfortunately, the flavor and aroma are almost impossible to describe, so you really need to experience it yourself to fully understand. I’ve heard it described using things like “earthy metallic honey,” and “rusty champagne,” but these really don’t do it justice.

Anyway, if you’ve never tried to make paella before, I really hope this inspires you to give it a go. The Arborio we use here is easy to find in the big grocery stores, and as long as you stick to the liquid/rice ratio, there’s not a lot that can go wrong. And like I said in the video, stay tuned for my future attempt at a more classic version. In the meantime, I hope you give this quick and easy paella a try soon. Enjoy!


Ingredients for 4 large portions:
(best to use a 12 or 13 inch wide skillet)

For the saffron broth:
2 tsp olive oil
reserved shrimp shells from 1 pound of jumbo shrimp
1/2 to 1 tsp saffron threads, depending on how strong you want the flavor
2 1/4 cups chicken broth
*Simmer for 20 minutes, strain and reserve. Be sure to season generously with salt, or your rice will be bland.

For the paella:
1 tbsp olive oil
8 oz sliced chorizo sausage, or any smoky, spicy sausage
1/2 yellow onion, diced
2 cloves garlic, minced
1 1/3 cup Arborio rice
1/2 cup green peas
1 tsp regular or smoked paprika, optional depending on how much was in the sausage
2 cups (exactly) hot saffron broth, or just plain hot chicken broth
1 pound peeled and deveined jumbo shrimp
1 sweet red pepper, cut into thin strips
salt and cayenne to taste
garnish top with a light drizzle of extra virgin olive oil, and freshly chopped Italian parsley
lemon wedges, optional (some love lemon, I prefer without, but give it a try and see)

*Bake at 425 degrees F. for 20 minutes, then finish over med-high flame until rice is just tender. It will be firm and slightly sticky. Don’t burn it, but you can leave it on the flame a little longer to try and get the rice to caramelize and crust onto the bottom of the pan, like the classic version. Be careful.
Read More..

Friday, February 14, 2014

Simple Sustainable and very delicious Rainbow Trout – Its Almost Too Easy

At the end of the voiceover for this super simple, yet very delicious rainbow trout recipe, I mention that it is an earth-friendly fish to eat. Of course I said that before actually checking, so I was kind of nervous as I Googled it after the fact, hoping that my assumptions were correct. Luckily its true, rainbow trout is considered a great sustainable seafood choice, and I didnt have to redo the narration.

This video recipe has it all when it comes to beginner fish cooks. Trout is a really mild flavored fish, its readily available, and usually comes cleaned, boneless, and ready to cook. Because it is so thin and delicate, it only takes a couple minutes under a hot broiler and youre ready to enjoy. In fact, I can see some of you novice cooks watching and thinking, hey, this seems too easy…whats the catch? There isn’t one.

The sauce here, if you can even call it a sauce, is a simple brown butter, spiked with a little lemon and parsley. Since trout is such a light fish, this minimalist preparation is perfect. If you are feeling adventurous, try some variations on the Italian parsley – almost any of the tender, sweet herbs – dill, tarragon, chervil, etc., will work beautifully here.

Whenever I post a basic fish recipe like this, Im always hoping to convert a few of you, "I dont like fish," or "I can’t cook fish," people. You really are missing out, and you only have so many good fish-eating years left. What are you waiting for? Enjoy!


Ingredients:
2 whole boneless rainbow trout
salt and pepper to taste
4 tbsp butter
2 tbsp lemon juice
2 tbsp chopped fresh parsley or other herb
Read More..

Sunday, February 2, 2014

CRACKED WHEAT USILI – DIET SERIES 2


Rice usili is a classic dish prepared by my grandma for our lunch boxes when we were kids. I had completely forgotten about this until my mom reminded me of this when we were online. Rice or arisi usili is usually prepared with rice and any type of dhal. This dish is a combination between upma and pongal. The dhal will be still whole and gives a good texture to the whole dish. The seasonings used here are also very simple ones. I am not sure where this dish is from. When I asked my mom about this, even she was not sure about this. If anybody is familiar with arisi usili, please share your thoughts and memories in this post friends. I have followed my grandma’s exact recipe here except that I substituted the rice with cracked wheat.


Coming on to my recipe, I made a lighter version of this dish with cracked wheat. This was equally delicious and comforting as the original one. I had tried this for the first time last week when my hubby was away on a business trip. That day I had this meen kuzumbu. The next day, I had prepared kathrikai kothsu to go along with this and we had it for breakfast. My hubby loved this very much and in fact he had finished off the whole thing. I cooked the usili in rice cooker. Rice cooker cooking makes the usili very fluffy when compared to cooking in pressure cooker, so here is my next recipe in my diet series. This combination of lentils and whole grains is also awesome :)


INGREDIENTS:

1. Cracked wheat, 1 cup, (fine rava wont work so well here, I have used a little bit bigger variety, this can be substituted with bulgur wheat).

2. Toor dhal or moong dhal, ½ cup.

3. Whole pepper corns, ¼ teaspoon.

4. Cumin seeds, ½ teaspoon.

5. Red chilies, 1-2, can be left whole or broken.

6. Curry leaves, a sprig.

7. Salt as per taste.


PREPARATION:

Wash the lentils well and cook them until they are done half way through. The lentils should still be whole. I cooked mine in the microwave. I cooked the dhal for 15 minutes with just enough water to cover the lentils. When cooking the dhal in the microwave, add a drop of oil to prevent the water from boiling over. Drain the water from the dhal and add it the cracked wheat. Transfer the contents to an electric rice cooker, add ½ teaspoon of salt, and 2 cups of water and cook until they are done. The cracked wheat can also be cooked on stove top also under medium flame, stirring in between until it is dry. Heat a small pan with some oil. Add the seasonings one by one and fry for a few seconds until good smell emanates from them. Pour the seasonings over the usili and mix everything well. Serve hot with any side dish like sambar, kothsu, or chutney.

Read More..

Friday, January 31, 2014

Simple Sherry Vinaigrette – Shake it baby!

Today’s post is really two separate demos. One is to show you a fantastic, all-purpose salad dressing using sherry vinegar. The second is a technique that makes emulsifying a dressing a fast and easy process. The reason I like sherry vinegar so much is that combines the complex, tartness of really good wine vinegar, with the rich, sweetness of balsamic vinegar. The vinaigrette shown today literally goes great with everything; whether it’s under a delicate filet of poached fish, over a grilled steak, or with an avocado salad, as you see pictured here (avocado salad sold separately).

The squeeze bottle method I show is such an easy way to emulsify a dressing and eliminates the need for the old “stand there and slowly drizzle in the oil in a fine stream” method. Lots of professional cooks will of course use a blender, which works great, but for the home cook making smaller amounts, I think my squeeze bottle is the way to go. By the way, as you’ll hear me attempt to explain during the video recipe clip, the small amount of mustard is a key ingredient, and if you leave it out, the oil and vinegar will not stay bound together. Needless to say, this is my base recipe and can be varied in countless ways by adding herbs, garlic, shallots, etc. Enjoy!


Ingredients:
1/3 cup sherry vinegar
1 cup olive oil
1 tsp Dijon mustard
salt and pepper to taste


Read More..

Thursday, January 9, 2014

Sausage Ribs – Deliver A Bone Jarring Hit to Your Football Food Lineup
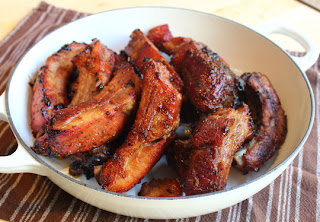
Chips and dips may be fine for regular season gridiron action, but when the playoffs roll around, and you need to go that extra yard to score a touchdown with your guests’ taste buds, these Italian sausage-spiced baby back ribs are a proven big game performer. 

If only I could’ve somehow added a few more forced football references into that intro.

Sweet and succulent pork ribs are never a bad addition to the game day buffet, but they can get predictable with the same old rubs and sauces. Here we have all the baby back rib-y goodness you know and love, but with the flavor profile of sweet Italian fennel sausage.

I know a lot of you wrap your ribs in foil for the initial slow/low cooking phase, as do I, but here we’re doing them uncovered to help achieve a slightly chewier, more toothsome texture. These are still quite tender and juicy, but just not too soft, and falling off the bone.

These really did have a wonderful flavor, which was further highlighted by the spicy, sweet, and tangy orange glaze. My only regret was that I didn’t have any hotdog buns around, as I would have pulled out the bones, and served these just like a real sausage sandwich. There’s always a next time.

Anyway, I enjoyed all that rich and fancy holiday feasting as much as anyone, but now all I’m craving is a couch, a cold beer, and a simple plate of ribs…that tastes like sausage. I hope you give these a try soon. Enjoy!


Ingredients for 2 racks of baby back ribs:
2 trimmed racks of baby back pork ribs
For the rub:
1 tbsp fennel seed, crushed fine
1 tbsp freshly ground black pepper
1 tbsp garlic salt
1 tbsp sugar
1 tbsp kosher salt
1/2 tsp cayenne or to taste
For the glaze (simmer until reduced by half):
1/3 cup brown sugar
1/3 cup orange juice
1/3 cup rice wine vinegar
2 tsp hot chili sauce or to taste
1 tbsp orange zest

- Bake ribs at 275 degrees F. for 2 1/2 to 3 hours or until fork tender.
- Cut, coat with glaze, and finish in a hot 425 degrees F. oven until caramelized.

View the complete recipe

Read More..

Friday, December 20, 2013

Food Wishes Cooking Classes – 2 Great Ways to Learn to Cook!

In-Home Cooking Classes and Culinary Guidance with Chef John (In the Flesh)

While I’m still trying to launch a video-based, online cooking academy (see details below), I am also starting to offer in-home, personalized culinary instruction for those of you that live in the San Francisco Bay Area. If you are interested in having me come to your home to teach you to cook personally, just click on this link, send me an email with what you want to learn and I will contact you to set up a class. By the way, if you are not from the Bay Area, but are filthy rich, and can fly me to your location, I am also available.

If you think the recipe clips I post are fun, and enjoy my style of cooking and sense of humor, then I think you will have a great time cooking side-by-side with me. If you haven’t already, check out my personal bio; while teaching at the California Culinary Academy, I enjoyed a reputation as one of the most popular instructors there, and have always considered myself a very effective teacher, no matter what your skill level. You will also get to see how closely I resemble the photo of George Clooney I use for my online persona.

One last note regarding the one-on-one cooking classes; if you are trying to lose weight and get in better shape the most important thing you can do for yourself is learn how to cook fresh, healthy food at home. If you are in one of those programs where they deliver that over-priced, pre-packaged food then we should talk. You can easily make all those same dishes for a fraction of the cost, and the taste and quality will be far superior.


The Other Way: Our Online, Video-based, Culinary Academy


Here is some basic information regarding our online culinary course:


  • We do not have a cost yet, but to give you a frame of reference, it will cost significantly less than a traditional culinary school, which can cost up as much as $50,000 per year! My hope is to keep it under $500 for the entire course.

  • You will learn the exact same competencies taught at these traditional academies. There are basically a few dozen KEY skills, recipes, and techniques to master. Really, that’s all! Most of the time spent in a traditional culinary school is NOT spent on learning these KEY skills.

  • The complete course should take 2 months for you to master. But, all students will have as much time as they need since everyone learns at a different speed.

  • You will learn by following my lessons and lectures online, and then will have “home work” to perfect these skills. Did you know that in the larger culinary schools students actually watch the Chef’s demos on a TV screen since they can’t sit close enough to watch what’s being demonstrated!

  • You will have the option of just learning the skills, or actually submitting your final competencies via video clips for us to evaluate. We will also have written tests for you to take to test you on the same basic information that a traditional culinary school student is expected to know when they graduate. These tests and home work are optional, but would be required to receive a certificate of culinary competency.

  • All students completing this course successfully will receive a certificate of culinary competency.

  • In addition, all students will get free resume and career assistance if they plan on using these newly acquired skills to enter the culinary industry as a cook or chef. Before I taught at the culinary academy, I ran a resume service for food industry workers, and I’m an expert in that field. If you want an entry-level job in food, this course will make that happen.

  • That’s all the basic info we have for now. We are taking our time to ensure a top quality product and have several Chefs, that currently teach at major traditional culinary schools, helping us put this program together.


    If you are interested in being contacted when the course is ready,
    please contact me. If youve already contacted me, its not necessary to contact me again.
Read More..